Inside A Makers' Studio
Inside A Makers' Studio

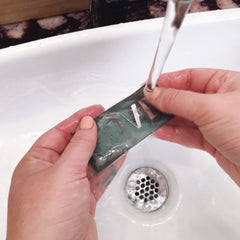
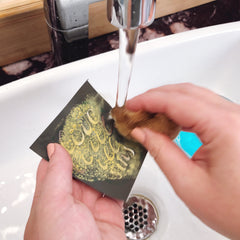
HOW TO CLEAN YOUR MESH STENCILS
August 05, 2020
WATCH THIS VIDEO TO LEARN HOW TO CLEAN YOUR STENCILS. YOU CAN USE YOUR STENCILS OVER AND OVER AGAIN WITH PROPER CARE.
FOR CHALKART, GEL ART INK, AND CERAMIC PAINTS - LUKEWARM WATER AND YOUR HANDS SHOULD DO THE TRICK.


FOR PAINTS AND GILDING SIZE, YOU MAY WANT TO USE DISH SOAP AND A SPONGE.


LASTLY, LAY STICKY SIDE UP TO DRY!


DIY TOWEL DIP DYEING
July 16, 2020
In this two-part tutorial, learn how to transform inexpensive, plain-looking tea towels into colorful items that are not just lovely to look at but can lift your spirits too.
These custom towels are great to use around your home or to give out as presents at any time of the year.
PART I: TOWEL DIP
STEP 1: PREPARE THE PAINT

This project uses Summer Nights - Rescue Restore Paint.
2 ounces of Rescue Restore Paint mixed with 20 ounces of water should be enough to color at least 3-4 tea towels.
STEP 2: DIP YOUR TOWEL

Hold your towel up and, coming from both sides, gather it towards the middle.
Dip half of the towel into the paint and let it soak up some color.
STEP 3: SQUEEZE OUT EXCESS PAINT
With one hand gripping the dry half of your towel, slowly pull the colored half out of the paint.Squeeze the excess paint out by letting the colored half of your towel pass through between the forefinger and thumb of your other hand.
Do this slowly to avoid splashing paint on yourself and make sure that your towel is not dripping with paint after this step.
STEP 4: MOVE THE PAINT
In another container with clean water in it, dampen the colored half of your towel.Use one hand to hold the towel up, with the colored half at the top.
With your other hand, squeeze your towel from top to bottom, helping the paint move downward, effectively covering the lower half of your towel with lighter shades of Summer Nights.
STEP 5: DRY YOUR TOWEL
Open your towel up and lay it on a piece of cardboard to dry.PART 2: STENCIL APPLICATION
STEP 1: PREP YOUR TOWEL
Lay your dry towel down flat.Have a cardboard underneath it to prevent ink from staining your work surface.
STEP 2: APPLY THE STENCIL

This project uses the Bless the Lord Mesh Stencil.Peel the backing off to expose the adhesive side and apply the stencil on your towel.
STEP 3: SPREAD YOUR INK

This project uses Hold Your Horses Gel Art Ink.
Squeeze some ink out along one edge of your spreader and apply the ink all over your stencil, holding your spreader at a 45-degree angle as you do so.
STEP 4: REMOVE THE STENCIL
Carefully peel your stencil off and rinse it right after use.Let it dry on a flat surface with the adhesive side up.
STEP 5: DRY AND HEAT-SET

Allow your towel to dry for at least 2 hours.
After which, heat-set your newly applied design. Place a lint-free rag on top of it and go over the rag with an iron for about 5 minutes.
Replicate this project and create your own customized tea towels with these products:
Summer Nights - Rescue Restore Paint
https://www.amakersstudioshop.com/products/summer-nights-rescue-restore-paint
Mesh Stencil - Bless the Lord - 8.5x11
https://www.amakersstudioshop.com/products/mesh-stencil-bless-the-lord-8-5-x-11
Chalkart Spreader
https://www.amakersstudioshop.com/products/chalkart-spreader
Gel Art Ink - Hold Your Horses
https://www.amakersstudioshop.com/products/gel-art-ink-hold-your-horses
Other Products Mentioned in the Video:
Gel Art Ink
https://www.amakersstudioshop.com/collections/gel-art-ink
Goodness Gracious - Rescue Restore Paint
https://www.amakersstudioshop.com/products/goodness-gracious-rescue-restore-paint
Mesh Stencil - Adventure - 8.5x11
https://www.amakersstudioshop.com/products/mesh-stencil-adventure-8-5x11
Mesh Stencil - Birds - 8.5x11
https://www.amakersstudioshop.com/products/mesh-stencil-birds-8-5-x-12

WATERCOLOR WASH PROJECT
June 25, 2019
Arguably the most frustrating thing about starting a craft project is trying to find all the right supplies you’ll need to complete it. That’s why we’ve put together Maker Monday bundles like this Watercolor Wash Bundle, which includes a stencil, Gel Art Ink samples, and other tools. With this kit, you’ll be able to create a gorgeous framed quote on a watercolor background. Your watercolor artwork can add a touch of color and inspiration to a spot in your home, or make a sweet gift for someone else.
But we don’t just give you the tools and tell you to figure it out! Amy Howard walks you through each bundle every week on Maker Monday, and this week is no different. So make sure to check out the bundle and follow along with Amy in this video so you can make some beautiful watercolor decor and gifts:
MATERIALS YOU’LL NEED

You’ll need the materials included in the Watercolor Wash Bundle, which includes:
- Believe In Your Dreams Stencil
- If the Creek Don't Rise Gel Art Ink Sample
- Hey Y'all Gel Art Ink Sample
- Bless His Heart Gel Art Ink Sample
- Metallic Gold ChalkArt Sample
- Spreader
- Artist’s Brush
You’ll also need sheets of watercolor paper and new or rescued frames for this project, along with a dish or plate to hold your inks.
CREATING YOUR FRAMED WATERCOLOR ARTWORK
- First, add a few tablespoons of water to a dish or plate.
- Take your artist’s brush and dab a small amount of Bless His Heart Gel Art Ink into the water. Mix well. Use a ratio of 75% water and 25% ink to get the pretty pink watercolor wash you see in Amy’s video.
- Once you’ve mixed Bless His Heart with water, test out the watercolor wash on a scrap piece of paper to make sure you’re happy with the color.
- When you’re testing out the watercolor wash, you can also practice your brushstrokes. Hold the brush at an angle so the bristles are nearly horizontal. When you paint using angled, sweeping strokes, you’ll get that beautiful layered watercolor effect.
- Next, cut out the part of the stencil you’re going to use.
- Lay out the stencil on your sheet of watercolor paper (don’t remove the backing yet) to see how much of the sheet you’ll paint. The background should be a little bigger than the stencil, but leave enough room for a border.
- Set the stencil aside so you can begin painting your sheet with a watercolor wash. Remember to hold the brush horizontally and use long, continuous strokes.
- Spread the paint down the sheet with your brush to create a thin, layered look. It’s not going to look perfect, and that’s the effect you’re going for!
- Once your sheet is dry, remove the adhesive back to your stencil and apply it to the center of your sheet.
- Load up your spreader with a small amount of Metallic Gold ChalkArt.
- Apply it on top of your stencil. Use a little pressure to press the Metallic Gold through the stencil.
- Pull the stencil from your watercolor sheet and let it fully dry.
- Finally, you can place your watercolor sheet inside a new or rescued frame. It’s now ready to hang in your home or be gifted to someone else!
WATERCOLOR WONDERS

Whether you want to create a beautiful frame, decorate a tea towel, or even stationery, Amy shares a handful of great ways to use these Gel Art Ink samples. Be sure to check out this week’s Maker Monday video — and don’t forget the Watercolor Wash Kit. It has everything you need to get that beautiful watercolor wash… permanently!
For more tips on using your Maker Monday kits, Like and Follow A Makers’ Studio on Facebook. Tune in on Mondays at 10 am Central every week for great tutorials like these!

CREATIVE & CUSTOM CHALKBOARD CALENDAR
May 14, 2019
Calendars are necessary if you want to keep your family on schedule, but that doesn’t mean you’re stuck with pinning something unattractive on the wall or creating a scheduling binder from scratch! Instead, make your own customized calendar with an old frame and some Rescue Restore Paint. In this fun Maker Monday video, Amy Howard walks you through how to create your own one-of-a-kind chalkboard calendar using A Makers’ Studio’s new Chalkboard Calendar Bundle. Once you’ve got the tools you need, you can check out the Maker Monday video below to start crafting:
MATERIALS YOU’LL NEED
For this chalkboard calendar project, you’ll need the following items, all of which you can find in the Chalkboard Calendar Bundle:

- Peace and Joy ChalkArt™
- Gathered Rescue Restore Paint (2oz)
- Little Black Dress Rescue Restore Paint
- Calendar stencil
- Sponge brush
- Spreader
You’ll also need a frame in whatever size and material you prefer (the bigger the better, though)! Also, don’t forget the chalk.
CREATE A CUSTOM CHALKBOARD CALENDAR WITH AMY
- Take your frame apart by removing the backing and the glass.
- Paint the backing of your frame with Little Black Dress Rescue Restore Paint and allow it to dry.
- Cut the days of the week and month you want to use out of the calendar stencil. Before you apply paint to your stencils, decide where you want them to go, as this will determine where you place your lines.
- Cut out the line stencils on the right side of your stencil sheet, making sure to cut only the line closest to the other stencils. Then, lay the stencil down to do your first line horizontally (across) your backing. Apply Peace and Joy ChalkArt™ with your spreader. Continue this until your line is finished, washing your stencil when needed.
- Lay your vertical line and repeat Step 4. Then continue the horizontal lines that will separate your days of the week, completing the grid.
- Stencil in your days of the week in their designated “boxes” with Peace and Joy ChalkArt™, and then add your month at the top.
- Season your calendar by turning your chalk sideways and rubbing it across the backing of your frame. Then, your chalkboard is ready to use!
- Optional: Paint your frame or dry brush it using the Gathered Rescue Restore Paint. Let the paint dry and then put your frame back together.
In no time at all, you’ve got an adorable chalkboard calendar you can wipe clean and re-customize each week or month! Best of all, it’s a one-of-a-kind calendar you can’t find anywhere else.

